|
|


|



Title: Make an HSL-based LinearGradientBrush class for use with PIL in Python
This post brings together a couple of earlier posts.
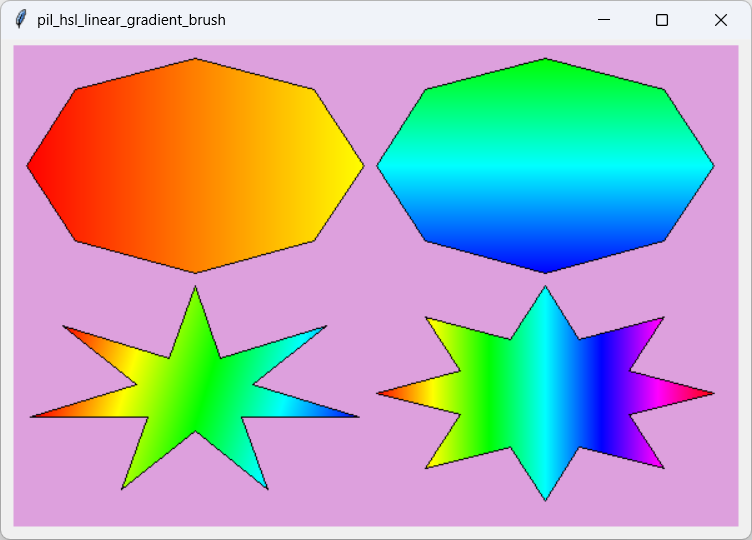
Blending in RGB and HSLRGB is fairly easy to understand and it maps naturally to the way computer monitors display colors, but it has some disadvantages. In particular, it's not obvious how gradient colors should blend from red to green to blue, for example. You can do it, but it takes a bit of work.In contrast, that kind of blending is trivial in the HSL color model. The hue value, which ranges from 0 to 360 degrees, specifies the color so you don't have to worry about what happens when the RGB colors must switch from combinations of red and green to combinations of green and blue. (If this doesn't make sense, look at the code in the post Make a LinearGradientBrush class for use with PIL in Python.) In the HSL model, you just need to interpolate over the smoothly ranging hue values. Filling a RectangleThe key to drawing the gradient is the function that draws a gradient-filled rectangle. The new example uses the following code to draw such a rectangle for use in an HSL linear gradient brush.def linear_hsl_gradient_rectangle(bounds, start_point, end_point, start_hsla, end_hsla): '''Fill the rectangle with a linear gradient brush.''' # Translate the start and end points. xmin, ymin, xmax, ymax = bounds start_point = (start_point[0] - xmin, start_point[1] - ymin) end_point = (end_point[0] - xmin, end_point[1] - ymin) # Unpack parameters. start_x, start_y = start_point end_x, end_y = end_point # Make an image to draw on. wid = xmax - xmin hgt = ymax - ymin image = Image.new('RGBA', (wid, hgt), 'white') pixels = image.load() # Get vector B, unit vector from start point toward end point. length = math.dist((start_x, start_y), (end_x, end_y)) B = [(end_x - start_x) / length, (end_y - start_y) / length] # Get H, S, L, and A distances. distances = [end_hsla[i] - start_hsla[i] for i in range(4)] # Color the rectangle. for x in range(wid): for y in range(hgt): # Get vector A, from start point to current point p. A = [x - start_x, y - start_y] # Calculate the projection's distance along B. proj_dist = A[0] * B[0] + A[1] * B[1] # Convert the distance into the color values. fraction = proj_dist / length hsl = [start_hsla[i] + fraction * distances[i] for i in range(4)] # Convert to RGB. r, g, b = hsl_to_rgb(hsl[0], hsl[1], hsl[2]) a = hsl[3] # Set the color. pixels[x, y] = (round(r), round(g), round(b), round(a)) # Return the result. return image This function gets coordinates of the start and end points where the color gradient should start and stop. It then calls the image's load method so it's ready to access the image's pixels.Next, the code gets the distance between the start and end points, and calculates the distances between the start and end colors' hue, saturation, lightness, and alpha values. The code then loops through all of the pixels in the image. For each pixel, it calculates the vector from that pixel to the start point and then projects the vector onto the vector leading from the start point to the end point. That indicates the distance through the gradient where this point lies. The code divides the length of the projected vector by the total length from the start point to the end point to get the fractional distance through the gradient. It then uses the fraction to calculate the pixel's adjusted hue, saturation, lightness, and alpha values. The code calls the hsl_to_rgb function (described in Convert between RGB and HSL color models in Python) to convert to RGB, rounds the results, and sets the pixel's color. After processing every pixel, the code returns the image. I know I've skimmed over several issues here. You can find more information in the earlier posts. Filling ShapesLook at Make a LinearGradientBrush class for use with PIL in Python for more details about how gradient brushes work. The following code snippet shows how this example draws its first shape in the upper left.# Polygon 1. bbox = [margin, margin, margin + rect_wid, margin + rect_hgt] points = get_star_points(-math.pi / 2, 8, 1, bbox) start_hsl = [0, 1, 0.5, 255] # Red end_hsl = [60, 1, 0.5, 255] # Yellow xmin, ymin, xmax, ymax = bbox ymid = (ymin + ymax) / 2 start_point = (xmin, ymid) end_point = (xmax, ymid) brush = HslLinearGradientBrush(start_point, end_point, start_hsl, end_hsl) pil_fill_polygon(image, brush, points) dr.polygon(points, fill=None, outline='black') The code first makes a bounding box and calls the get_star_points function (courtesy of the post Draw stars in Python) to get the points needed to draw the polygon.The code then defines the color gradient's starting and ending colors. The gradient starts at red (hue = 0) with full saturation and normal lightness. It ends at yellow (hue = 60), again with full saturation and normal lightness. Both colors have alpha equal to 255 so the colors are completely opaque. Next, the program places the gradient's start and end points at the left and right edges of the bounding box. It the creates a new HslLinearGradientBrush to represent the gradient. (See the post Make a LinearGradientBrush class for use with PIL in Python for details about how the brush classes work.) The program then calls the pil_fill_polygon (see the brush post again) to fill the polygon with the brush. Finally, the method outlines the polygon and, if desired, draws the gradient start and end points. The code that draws the other shapes is similar except it uses different shapes and different gradients. ConclusionSometimes the HSL color model is easier to use than the RGB model, in this case because hue ranges smoothly from 0 to 360 while covering all of the colors in the rainbow. (Technically it also ranges across colors that aren't in the real rainbow, namely colors that mix blue and red.) In my next post, I'll add the ability to interactively experiment with different saturation and lightness values.Meanwhile, download the example to experiment with it and to see additional details. See the earlier posts for details about how to use gradient brushes, how to convert between the RGB and HSL color models, and how to draw stars. |