|
|


|



Title: Make an HSL color selection dialog in Python
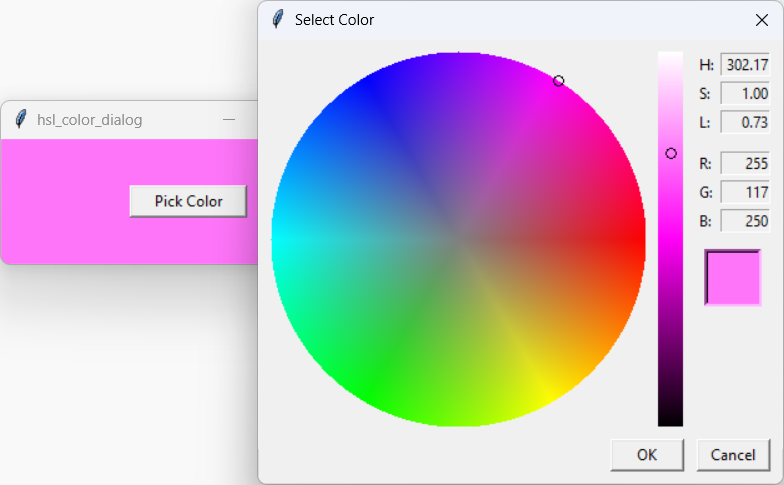
My example Make an HSL color picker in Python shows how to use an HSL color wheel to let the user select a color. This example converts that program into a dialog that your programs can call. The conversion isn't too hard, but there are several pieces that must fit together to make it all work nicely. Setting UpThe new dialog is represented by the HslColorDialog class. Here's that class's declaration and constructor.class HslColorDialog(tk.Toplevel): def __init__(self, parent, hsl_color=None): super().__init__(parent) self.transient(parent) # Keep dialog above parent. self.title('Select Color') self.protocol('WM_DELETE_WINDOW', self.cancel_clicked) # Assume we will cancel. self.result = None # Start with the desired color. if hsl_color is None: # Start with red as a default. self.h_value_var = tk.DoubleVar(value=0) self.s_value_var = tk.DoubleVar(value=1) self.l_value_var = tk.DoubleVar(value=0.5) else: # Start with the color passed into the constructor. self.h_value_var = tk.DoubleVar(value=hsl_color[0]) self.s_value_var = tk.DoubleVar(value=hsl_color[1]) self.l_value_var = tk.DoubleVar(value=hsl_color[2]) # Build the user interface. self.build_ui() self.wheel_reticle = 0 self.gradient_reticle = 0 # Draw the color wheel. self.draw_wheel() self.draw_gradient() self.draw_wheel_reticle() self.draw_gradient_reticle() self.show_sample() # Grab events for this dialog. self.grab_set() The class inherits from tk.Toplevel so it can act as a top-level window.\Most of the constructor is straightforward or follows from the earlier HSL color wheel example. The two most interesting pieces are highlighted in blue. The first blue statement sets the dialog's result value to None. When the dialog closes, it will return result, so this code assumes the user is not accepting a color so the dialog should return None. The code will later set this value to something more useful if the user picks a color and clicks OK. The constructor then calls some methods that build the user interface as in the previous example. It finishes by calling self.grab_set to make future events go to the dialog and not the program that displayed it. Binding Enter and EscapeThe only significant change to the user interface is the addition of the OK and Cancel buttons. Creating the buttons is straightforward. The UI setup code also uses the following code to bind the Enter and Escape keys to the event handlers for those buttons.# Bind Enter and Escape. self.bind('<Return>', self.ok_clicked) self.bind('<Escape>', self.cancel_clicked) # Bind Enter and Escape. self.bind('<Return>', self.ok_clicked) self.bind('<Escape>', self.cancel_clicked) If the user presses the Enter key, the dialog accepts the current color as if the user had clicked OK. Similarly, if the user presses the Escape key, the dialog closes as if the user had clicked Cancel.Handling OK and CancelWhen the user clicks OK or presses the Enter key, the following code executes.def ok_clicked(self, event=None): '''Close and accept the color selection.''' self.result = [ self.h_value_var.get(), self.s_value_var.get(), self.l_value_var.get(), 255, ] self.cancel_clicked() This code saves the currently selected color in self.result (remember that value initially set to None?) and then calls the following method. That method also executes if the user clicks Cancel or presses the Escape key.def cancel_clicked(self, event=None): # Destroy the tkinter window. self.destroy() This code simply destroys the dialog.So how does the dialog return a value? The key is in the following show method. def show(self): '''Display the dialog, wait for it to end, and return its results.''' self.wait_window() return self.result This method calls wait_window to pause until the window is destroyed. When the cancel_clicked method destroys the window, the window and its child widgets are destroyed, but any custom properties are still available. The show method then returns self.result to the calling program. Remember, that value will either be None or the currently selected color if the user clicked OK.Displaying the DialogWhen you click the main program's Pick Color button, the following code executes.def pick_color(self): '''Select the window's background color.''' # Get the window's background color. bg = get_bg_color(self) hsl = rgb_to_hsl(bg[0], bg[1], bg[2], 255) # Display the dialog. dlg = HslColorDialog(self.window, hsl) color = dlg.show() if color is not None: # Convert to a tkinter color. tkinter_color = hsl_to_tkinter(color) self.window.config(background=tkinter_color) This code calls the get_bg_color function (described shortly) to get the background color of the main program's window. It then calls rgb_to_hsl to convert the RGB background color into an HSL color.The code then creates an HslColorDialog, passing its constructor the main progam's window and the background color so the dialog can use that color as its initial selection. The method then calls the dialog's show method to display it. It saves the returned color in the variable color. If the result is not None, the code calls hsl_to_tkinter to convert the color from HSL to a tkinter color. It finishes by setting the main program's background to that color. Here's the get_bg_color helper function. (I wrote it because getting window background colors was such a hassle.) def get_bg_color(widget): '''Return the widget's background color.''' bg = widget['bg'] # In Windows, SystemButtonFace rgb16 = widget.winfo_rgb(bg) # Convert to 16-bit RGB rgb8 = tuple((x >> 8 for x in rgb16)) # Convert to 8-bit RGB return rgb8 Getting a widget's background color is easy. You can just "index" the widget with the key bg. Unfortunately, the result is sometimes the name of a color. For example, in Windows the default is SystemButtonFace.To fix that, the code calls widget.winfo_rgb to convert the color into an RGB value. Unfortunately, the result uses 16-bit values for the red, green, and blue color components and we need 8-bit values. To fix that, the code uses a tuple comprehension to shift each of the red, green, and blue component values 8 bits to the right, truncating the 8 least significant bits from the value. The function then returns the 8-bit RGB tuple. ConclusionIt takes a little work to set up the dialog but then it's quite easy to use. Now with just a few lines of code, you can display the dialog and let the user pick colors from an intuitive HSL color wheel.Download the example to experiment with it and to see additional details. |